Tiled
Objectives:
- Install Tiled and create a tilemap
- Get MonoGame to display the tilemap
- Add an Object layer to the tilemap in Tiled
- Utilize the Object layer for collision detection
Assets For This Tutorial
Tiled
Go to the Tiled website, download, and install the software. No special steps for Mac or PC.
After successfully installing, launch Tiled and create a new Project in the Content folder of your MonoGame project.
Then make a new Map File-->New-->New Map and use the settings:
- Orthogonal View
- CSV
- Right Down tile render order (the code later will assume this is the case)
- Set the map size to Fixed at 50x30 tiles since the spritesheet is designed with 16x16px tiles (and the default playfield for MonoGame is 800x400)
Clicking OK will create a new map (untitled.tmx).
Next, you need to load in a new spritesheet File -> New -> New Tileset
- Call it ‘terrain’
- Based on Tileset Image
- do NOT embed the image in the map
- select the “Terrain (16x16).png” from the assets provided
- set the tile size to 16x16 with 0 margin and spacing.
Save this directly into the Content folder of your MonoGame project. Once that’s done, switch back to the tilemap tab. The spritesheet you just loaded should now be on the right side. This will be your palette.
Using the Stamp Brush B select one or more of the tiles from the palette and paint the selection on the map canvas. Individual clicks will paint your selection once and dragging the pointer will paint on each tile passed.
To fill larger spaces with less hassle and less carpal tunnel, holding shift and clicking between two points will paint in a line. For larger areas, the Bucket Fill F and Shape Fill P (which can do rectangles or circles) are at your disposal.
To erase small areas, use the Eraser
E, but for large areas, make a Rectangular SelectionRand delete.
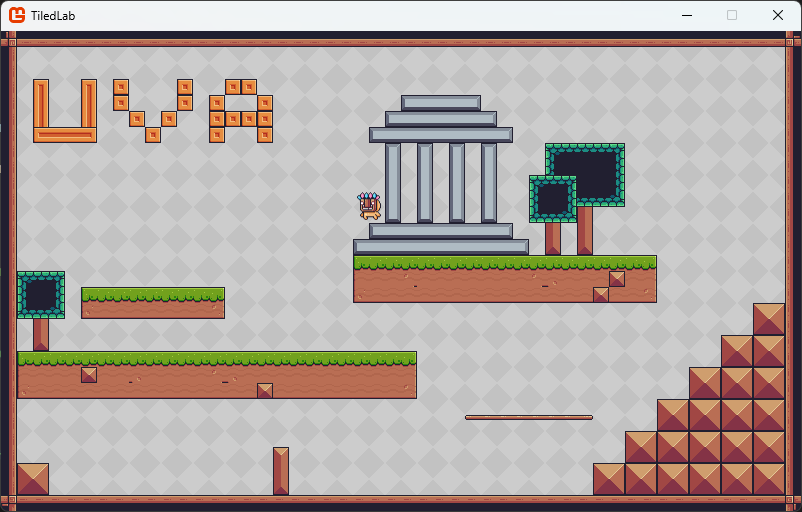
Use the palette to create a basic frame, a couple of ledges, and blocks. Below is just one example.
Save the .tmx directly into the Content folder of your project. Having both the working .tmx and .tsx files in that folder will come in handy later.
Using TileMaps in MonoGame
To use this .tmx in Monogame, add the TiledCS package to Visual Studio using the Package Manager Console.
dotnet add package TiledCS
Then add these namespaces to the code.
using System.Linq; //this will come in later
using TiledCS;
Under Game(), initialize the tilemap as well as create an enum that will help with transposing sprites later (if there are any sprites to flip/rotate)
// initialize the tiled map
private TiledMap map;
private Dictionary<int, TiledTileset> tilesets;
private Texture2D tilesetTexture;

// used to flip/rotate sprites as necessary later
[Flags]
enum Trans
{
    None = 0,
    Flip_H = 1 << 0,
    Flip_V = 1 << 1,
    Flip_D = 1 << 2,

    Rotate_90 = Flip_D | Flip_H,
    Rotate_180 = Flip_H | Flip_V,
    Rotate_270 = Flip_V | Flip_D,

    Rotate_90AndFlip_H = Flip_H | Flip_V | Flip_D,
    }
Next, in the MGCB, add the Terrain (16x16).png file that was provided in the assets folder and re-build the project.
In LoadContent() add the following lines:
    map = new TiledMap(Content.RootDirectory + "\\mapdemo.tmx");
    tilesets = map.GetTiledTilesets(Content.RootDirectory + "/");
    tilesetTexture = Content.Load<Texture2D>("Terrain (16x16)");
Things get a bit weird now. In the sidebar of your project in Visual Studio, you should see both your .tsx and .tmx files under the Content folder. For both files, right-click, go to Properties, and change the Copy to Output Directory option to ‘Copy if newer.’
Finally, in Draw(), add the following before any character sprites:
var tileLayers = map.Layers.Where(x => x.type == TiledLayerType.TileLayer);
    foreach (var layer in tileLayers) {
        for (var y = 0; y < layer.height; y++) {
            for (var x = 0; x < layer.width; x++) {
                // Assuming the default render order is used which is from right to bottom
                var index = (y * layer.width) + x;
                var gid = layer.data[index]; // The tileset tile index
                var tileX = x * map.TileWidth;
                var tileY = y * map.TileHeight;

                // Gid 0 is used to tell there is no tile set
                if (gid == 0) {
                    continue;
                }

                // Helper method to fetch the right TieldMapTileset instance
                // This is a connection object Tiled uses for linking the correct tileset to the
                // gid value using the firstgid property
                var mapTileset = map.GetTiledMapTileset(gid);

                // Retrieve the actual tileset based on the firstgid property of the connection object
                // we retrieved just now
                var tileset = tilesets[mapTileset.firstgid];

                // Use the connection object as well as the tileset to figure out the source rectangle
                var rect = map.GetSourceRect(mapTileset, tileset, gid);

                // Create destination and source rectangles
                var source = new Rectangle(rect.x, rect.y, rect.width, rect.height);
                var destination = new Rectangle(tileX, tileY, map.TileWidth, map.TileHeight);

                // You can use the helper methods to get information to handle flips and rotations
                Trans tileTrans = Trans.None;
                if (map.IsTileFlippedHorizontal(layer, x, y)) tileTrans |= Trans.Flip_H;
                if (map.IsTileFlippedVertical(layer, x, y)) tileTrans |= Trans.Flip_V;
                if (map.IsTileFlippedDiagonal(layer, x, y)) tileTrans |= Trans.Flip_D;

                SpriteEffects effects = SpriteEffects.None;
                double rotation = 0f;
                switch (tileTrans)
                {
                    case Trans.Flip_H: effects = SpriteEffects.FlipHorizontally; break;
                    case Trans.Flip_V: effects = SpriteEffects.FlipVertically; break;

                    case Trans.Rotate_90:
                        rotation = Math.PI * .5f;
                        destination.X += map.TileWidth;
                        break;

                    case Trans.Rotate_180:
                        rotation = Math.PI;
                        destination.X += map.TileWidth;
                        destination.Y += map.TileHeight;
                        break;

                    case Trans.Rotate_270:
                        rotation = Math.PI * 3 / 2;
                        destination.Y += map.TileHeight;
                        break;

                    case Trans.Rotate_90AndFlip_H:
                        effects = SpriteEffects.FlipHorizontally;
                        rotation = Math.PI * .5f;
                        destination.X += map.TileWidth;
                        break;

                    default:
                        break;
                }

                // Render sprite at position tileX, tileY using the rect
                _spriteBatch.Draw(tilesetTexture, destination, source, Color.White,
                    (float)rotation, Vector2.Zero, effects, 0);
            }
        }
    }
When you hit Play, you should see your character on the tilemap that you created.
Creating an Object Layer
Return back to Tiled. Up to this point you’ve been painting in a tile layer named Tile Layer 1. Now add a new object layer Layer-->New-->Object Layer, call it ‘Ground’, and select it. The tile layer should darken in appearance. The power of the object layer is that you can draw regions–like those for collisions or goal zones–to use in MonoGame without having to hand code each of the shapes and keep track of them. It’s sort of a WYSIWYG tool for level design.
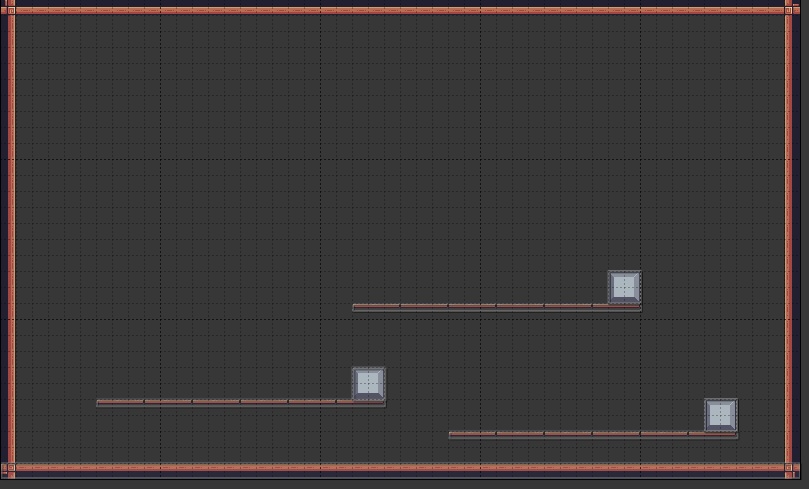
Using the Insert Rectangle R tool, draw a box around each of the regions that would be considered “ground.”
These don’t snap to the grid, but you can manually override their size and positions in the property window for more precision.
Save the .tmx again to the Content folder of your project.
Utilizing the Object Layer in MonoGame
To make use of the Object layer you created, initialize a new TiledLayer
// create a layer to check for ground
private TiledLayer groundLayer;
Then in LoadContent() provide it with objects (this is using the Linq namespace declared above)
groundLayer = map.Layers.First(l => l.name == "Ground");
In Update(), add the following:
// Check player ground collision
hitGround = false;
foreach (var obj in groundLayer.objects)
{
    var objRect = new Rectangle((int)obj.x, (int)obj.y, (int)obj.width, (int)obj.height);
    // can access as either a Rectangle or the direct obj calls
    bool xoverlap = (playerPosition.X < objRect.Right) && (playerPosition.X + 32 > objRect.Left);
    // a little wiggle room in these calcs in case the player is falling fast enough to skip through
    bool yoverlap = (playerPosition.Y + 32 - obj.y < 2) && (playerPosition.Y + 32 - obj.y > -2);

    if (xoverlap && yoverlap)
    {
        hitGround = true;
        // once a collision has been detected, no need to check the other objects
        break;
    }
}
The bool can then be used to fix or change the player’s physics as appropriate.
Now that both the tile layer and the “ground” object layer are working in MonoGame, changing anything in either layer in the game only requires changes to be made in Tiled (and saved).
Challenge: Add another object layer in Tiled for vertical collision and incorporate it into MonoGame.
Challenge 2: Make a level with a warp portal mechanic eg. if the player enters a certain zone, their position gets changed to somewhere else on the map.
Resources:
TheBoneJarmer’s TiledCS project and especially ironcutter24’s TiledCS example. Jonathan Whiting’s piece on Collision. The Tiled documentation
The really awesome Pixel Adventure assets by Pixel Frog on itch.io under Public Domain License.